
How to Propagate Houseplants
Using the four most common methods:
Offsets
Division
Cuttings
Layering

Written By: Estrella Mejia
14 May 2021
What is Propagation?
Propagation, in terms of houseplants, is using one ‘mother plant’ to produce more of that same plant. Propagating is used by nurseries to create more plants using the ones they currently have. For this paper, we will call the original plant the mother plant, and the plant that is being produced the child plant.
Methods of Propagation
There are multiple methods to propagating houseplants. This tutorial will cover offsets, division,
cuttings, and layering. Propagation from seeds will not be covered as most houseplants do not
have seeds and beginners may find seed propagation difficult.
For each propagation method, there will be a list of plants that can be propagated using the
method. However, the list of plants is not extensive. The plants on the list will be the plants that
are most often propagated using that method. More plants could be propagated with said method
than just those listed. There are also some plants that cannot use some methods mentioned. So it
is important to look into which method works best with you’re the houseplant you intend to
propagate.
Offsets
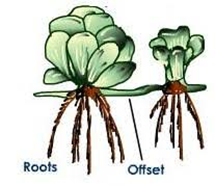
Offsets are small replicas of the mother plant that grow from the main stem. This is one of the easiest ways to propagate a plant. The steps for this are:
- Locate the offset.
- Cut at the stem that is connecting the offset to the mother plant.
- Make sure you leave some roots on the offset.
- Pot the offset in soil.
- Water the new child plant.
As offsets grow from the mother plant, they gain extra nutrients. These extra nutrients allow the offset to focus on growing roots for itself to then become its own plant. The offset has a fully grown root system and is basically its own plant already. Houseplants that grow offsets and can be propagated using this method are snake plants, succulents, Chinese money plants, and spider plants.
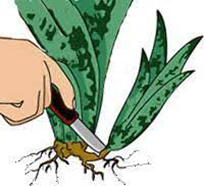
Division
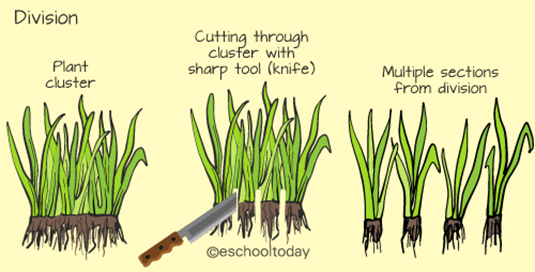
Propagating using division is exactly what it sounds like. Using a large mother plant and dividing it into multiple smaller plants. Similar to offsets, the plants that are created using this method will be ready to pot right after the division occurs. The steps to propagate using division are:
- Take the mother plant out of the pot.
- Locate where you would like to split the plant. Refer to Figure 2.
- Use a sharp cutting tool to cut between where you wanted to split the plant
- Pot the clusters into soil.
- Water the new child plant(s).
This method is very successful as all divide clusters should result in a full plant. Plants that are often propagated using division are peace lily, Chinese evergreen, zz-plant, and herbs.
Cuttings
Plant cuttings are pieces of a plant that, if cut at the correct location, can sprout roots and new growth. This method is a bit more difficult than the previous method because the part of the plant that is being cut from the mother plant does not have roots yet. There are some plants which you can only do stem cuttings and others that allow for leaf cuttings.
Stem
Stems are the part of the plant which the leaves are connected to bit are not the leaves themselves. Certain plants have nodes on their stems that will allow for propagation. For the placement of a plant’s nodes refer to figure 3. When referring to where on the plant to cut refer to figure 4.
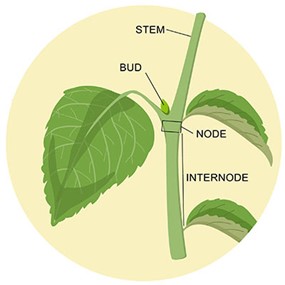
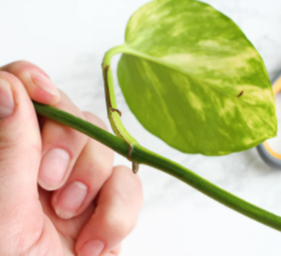
When propagating using stem cuttings it is important to know where on the stem to cut. Certain plants such as succulents are a lot more forgiving and can grow roots from any part of the stem. However, other plants may not be so forgiving, and need to be cut at a specific place of the stem. Here are the general steps:
- Look at the stem of the plant
- Locate the node
- Nodes are usually right where the leaf is sprouting from, such as in Figure 3.
- Sometimes they look like a small root, like the pothos in Figure 4.
- Cut the stem right below the node, look at the ‘cut here’ line in Figure 4.
- Place the cut stem into water or directly into the dirt.
Depending on whether you place the freshly cut stem into water or dirt use the following steps:
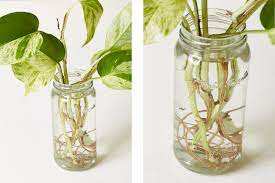
- Replace the water every few days, ensure the node is always in the water.
- Roots will begin growing from the node
- Once the roots reach about 2 to 3 inches or 5 to 8 centimeters, such as in Figure 5 it is ready to be placed into soil.
- Pot the plant into soil and water it frequently
- Make sure the soil stays moist and slowly start watering it less over the next 5 weeks. Because the plant was living in water for a long time, its roots are used to having water readily available. Watering the plant more often than normal for the first couple of weeks, will help not shock the new plants roots
- Once the plant is a few weeks old and its watering routine is normal, there is your new plant.
If the cutting is placed into dirt, continue at this step 5:
- Once the plant is in soil make sure you water it frequently and don’t let it dry out.
- Water it every 2 to 3 days for about 2 weeks, then about every 4 to 6 days until the new plant is about 5 weeks old.
- After about 5 weeks water the plant as normal.
- Once the plant shows signs of new growth your plant is fully developed and there is your new plant.
Although placing your cuttings directly into soil has fewer steps and seems simple, it requires
frequent watering as the soil will dry out fast. Placing your cuttings in water is fascinating as you
get to see the roots grow bigger each day. No way has been proven more successful than the
other, so this is up to you. This is true for most plants other than succulents; succulents grow
better if placed into soil. Remember to keep in mind how much water the mother plant usually
needs to survive.
Plants that work well as stem cuttings are string of hearts, pothos, philodendrons, monsteras,
peperomias, string of pearls, string of dolphins, and succulents.
Leaf
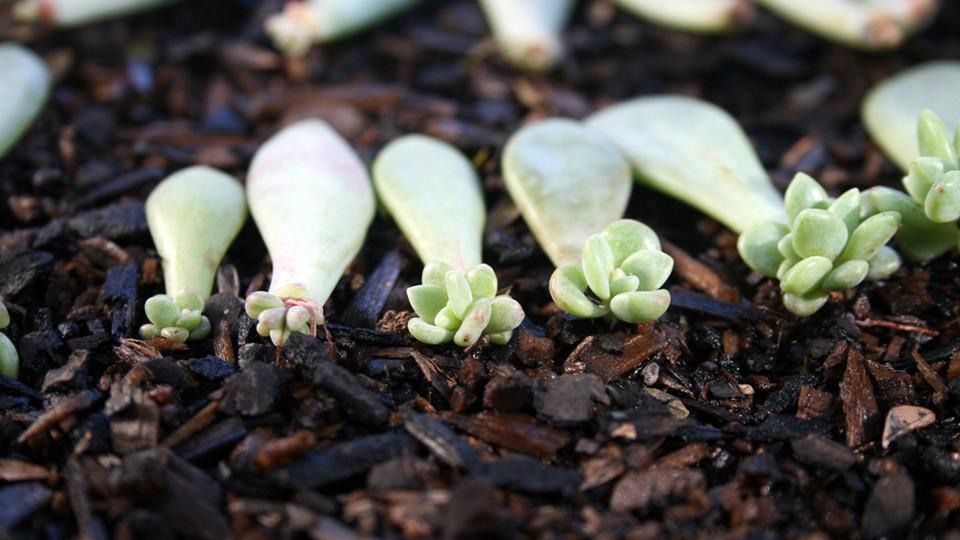
Propagating using leaf cuttings is a bit more complicated than stem cuttings because it takes a longer time to grow roots and not all plants can be propagated using this method. This method involves cutting a plants’ leaf and having roots, and eventually new leaves, grow from that leaf. To propagate using leaf cuttings use the following steps:
- Locate the leaf you would like to use for propagation
- Cut at the very end of the leaf (closest to the stem)
- This can differ with snake plants: snake plants can be cut at any part of the leaf and grow from there
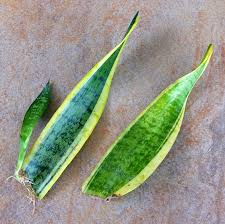
Figure 7: Snake Plant Leaf Cuttings
- This can differ with snake plants: snake plants can be cut at any part of the leaf and grow from there
- Place the leaf in water or soil to begin the rooting process
- Make sure to water frequently for several weeks
- Once your leaf cutting starts growing a new leaf you can put it in spoil and begin watering less frequently.
The rest of the steps for water or dirt are the same as the section for stem cuttings. The waiting
time for leaves to show signs of new growth is a lot longer than for stem cutting.
Plants that can be propagated using leaf cuttings are peperomias, snake plants, and succulents.
Layering
Propagation using layering involves growing roots on the stems of the mother plant and then cutting them after the roots have gotten big enough. This can be thought of as creating offsets on the stems of the plant. Somewhat of a combination of the offset and stem cutting propagation method. The steps include:
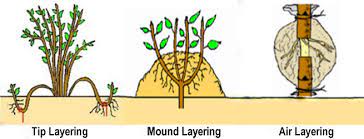
- Look at which method you would like to attempt. Refer to Figure 8
- Depending on the method you’ve chosen:
- For Tip layering: Take a stem of your mother plant and bury it in the soil right next to the plant.
- For Mound Layering: Take some extra dirt and bury the mother plant leaving some leaves and stems sticking out of the mound.
- For Air Layering:
- Grab some saran wrap or something you can wrap around the plant stem.
- Place some wet dirt or wet sphagnum moss in the saran wrap.
- Wrap the saran wrap with the moss or dirt around the section of the plant you would like to make roots grow from.
- After a couple of weeks, gently uncover the roots from the dirt or moss.
- Cut between where the stem has grown roots and the mother plant meet
- Place cut piece into soil and water as normal. There is no need to give the plant extra water because it has been growing in a pot of dirt the whole time, and its roots are well established. There you have your fully grown plant.
This method is nice because the only extra step is making sure the part of the stem where the
roots are going to grow is placed in wet substance so their roots can grow. This step is also
good for beginners who may not want to cut their mother plant, without knowing if the child
plant is going to make it.
Plants that work with this propagation method are umbrella plants, fiddle leaf figs, rubber
tree plants, philodendrons, and monsteras.
Keeping the Propegated Plant Alive
Some helpful tips to ensure that your propagation attempt is successful are:
- When it comes to cuttings wetter is better because new roots struggle more with gathering water for the plant.
- You can wait until there is new growth coming from the soon-to-be child plant before placing it in the pot of dirt. New growth usually means the plant is very healthy.
- If you want the roots from your new plant to grow faster, you can use rooting hormone.
- The more sun the faster the plant will grow, as it has plenty of nutrients to absorb. Never direct sunlight though.
That is all you need to know about the four best methods to propagate your houseplants. If your houseplant is not listed as plants that can work with a specific method make sure you look into which of these methods would work best for your plant. Now enjoy creating new houseplant friends with those you already own.